
Redux
Redux
回顾:
纯函数:
- 确定的输入,一定会产生确定的输出
- 函数在执行过程中,不能产生副作用(调用函数时,修改了参数,全局变量或者其他)
eg.
// 纯函数
function foo(num) {
  return num + 10;
}
foo(10); // 确定的输入有确定的输出

// 不是纯函数
let count = 10
function foo(num) {
  return num + count;
}
foo(10); // 确定的输入不一定确定的输出,count可变,函数内部依赖了外界的变量count

// 产生副作用
const info = {name: "xxx"}
function foo(info) {
  info.name = "aaa";
}
foo(info);
是什么
redux就是一个实现数据集中管理的容器,遵循三大基本原则:
- 单一数据源
- state 是只读的
- 使用纯函数来执行修改
注意的是,redux并不是只应用在react中,还与其他界面库一起使用,如Vue
工作原理
redux要求我们把数据都放在 store公共存储空间
一个组件改变了 store 里的数据内容,其他组件就能感知到 store的变化,再来取数据,从而间接的实现了这些数据传递的功能
工作流程图如下所示:
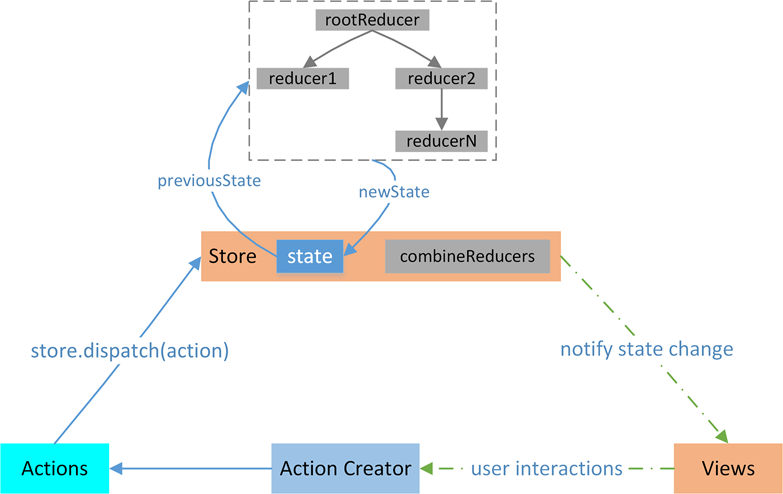
根据流程图,可以想象,React Components 是借书的用户, Action Creactor 是借书时说的话(借什么书), Store 是图书馆管理员,Reducer 是记录本(借什么书,还什么书,在哪儿,需要查一下), state 是书籍信息
整个流程就是借书的用户需要先存在,然后需要借书,需要一句话来描述借什么书,图书馆管理员听到后需要查一下记录本,了解图书的位置,最后图书馆管理员会把这本书给到这个借书人
转换为代码是,React Components 需要获取一些数据, 然后它就告知 Store 需要获取数据,这就是 Action Creactor , Store 接收到之后去 Reducer 查一下, Reducer 会告诉 Store 应该给这个组件什么数据
基本使用
安装redux:npm install redux
创建一个store的公共数据区域来保存state
import { createStore } from 'redux' // 引入一个第三方库

const store = createStore() // 创建数据的公共存储区域(管理员)
还需要创建一个记录本去辅助管理数据,也就是reduecer,本质就是一个函数,接收两个参数state,action,返回state(将传入的state和action结合起来生成一个新的state)
// 设置默认值
const initialState = {
  name: "never"
  counter: 100
}

const reducer = (state = initialState, action) => {
}
然后就可以将记录本传递给store,两者建立连接。如下:
const store = createStore(reducer)
如果想要获取store里面的数据,则通过store.getState()来手动获取当前state
console.log(store.getState());
下面再看看如何更改store里面数据,是通过dispatch来派发action,通常action中都会有type属性,也可以携带其他的数据
// 修改store中的数据: 必须action
const nameAction = { type: "change_name", name: "kobe" }
store.dispatch(nameAction)

store.dispath({ type: "change_name", name: "haha" })

store.dispatch({ type: "add_number", num: 5 })
下面再来看看修改reducer中的处理逻辑:
// 定义reducer函数: 纯函数
// 两个参数:
// 参数一: store中目前保存的state
// 参数二: 本次需要更新的action(dispatch传入的action)
// 返回值: 它的返回值会作为store之后存储的state
const reducer = (state = initialState, action) => {
  switch(action.type) {
    case "change_name":
      return { ...state, name: action.name }
    case "add_number":
      return { ...state, counter: state.counter + action.num }
    default:
      return state
  }
}
注意,reducer是一个纯函数,不要直接修改state,需要拷贝一份再赋值
这样派发action之后,即可以通过store.subscribe来自动监听store的变化,调用unsubscribe会取消监听变化如下:
// 通过订阅自动监听store的变化
const unsubscribe = store.subscribe(() => {
  console.log("订阅数据的变化:", store.getState())
})

// 取消监听
unsubscribe()
在React项目中,会搭配react-redux进行使用
完整代码如下:
const redux = require('redux');

// (reducer.js)
const initialState = {
  name: "never"
  counter: 100
}

// 创建reducer
const reducer = (state = initialState, action) => {
  switch(action.type) {
    case "change_name":
      return { ...state, name: action.name }
    case "add_number":
      return { ...state, counter: state.counter + action.num }
    default:
      return state
  }
}

// 根据reducer创建store(index.js)
const store = redux.createStore(reducer);

// 自动监听state变化
const unsubscribe = store.subscribe(() => {
  console.log("订阅数据的变化:", store.getState())
})

// 通过dispatch派发修改store中的state
store.dispatch({ type: "change_name", name: "lilei" })
store.dispath({ type: "change_name", name: "haha" })

// 调用unsubscribe取消监听
unsubscribe()
store.dispatch({ type: "add_number", num: 5 })
// 手动监听state变化
console.log(store.getState())
优化:封装可复用的action
// (actionCreators.js)
const ADD_NUMBER = "add_number"
const CHANGE_NAME = "change_name"

const addNumberAction = (num) => {
  return {
    type: ADD_NUMBER,
    num
  }
}
// return的简写方法() => {return ...}等于() => ({...})
const changeNameAction = (name) => ({
  type: CHANGE_NAME,
  name
})

module.exports = {
  changeNameAction,
  addNumberAction
}
使用封装的action
store.dispatch(changeNameAction("kobe"))
store.dispatch(addNumberAction(10))
小结
- 定义
reducer和createStore可以帮助创建store,用来存储state store.dispatch帮助派发action,action来描述自己想要如何修改storestore.getState这个方法可以帮助获取store里边所有的数据内容store.subscrible方法订阅store的改变,只要store发生改变,store.subscrible这个函数接收的这个回调函数就会被执行
Redux 代码优化
- 将派发的
action生成过程放到一个actionCreators函数中 - 将定义的所有
actionCreators的函数, 放到一个独立的文件中:actionCreators.js actionCreators和reducer函数中使用字符串常量是一致的, 所以将常量抽取到一个独立constants的文件中- 将
reducer和默认值(initialState)放到一个独立的reducer.js文件中, 而不是在index.js index.js中创建store和导出store
Redux 三大原则
单一数据源
- 整个应用程序的
state被存储在一颗object tree中,并且这个object tree只存储在一个store中; - Redux 并没有强制让我们不能创建多个
Store,但是那样做并不利于数据的维护; - 单一的数据源可以让整个应用程序的
state变得方便维护、追踪、修改;
**State 是只读的 **
- 唯一修改
State的方法一定是触发action,不要试图在其他地方通过任何的方式来修改State; - 这样就确保了
View或网络请求都不能直接修改state,它们只能通过action来描述自己想要如何修改state; - 这样可以保证所有的修改都被集中化处理,并且按照严格的顺序来执行,所以不需要担心竟态的问题;
**使用纯函数来执行修改 **
- 通过
reducer将旧state和actions联系在一起,并且返回一个新的State; - 随着应用程序的复杂度增加,我们可以将
reducer拆分成多个小的reducers,分别操作不同state tree的一部分; - 但是所有的
reducer都应该是纯函数,不能产生任何的副作用;
Redux 在 react 中的使用
未使用 react-redux
创建
redux对应的store文件夹index.jsimport { createStore } from "redux" import reducer from "./reducer" const store = createStore(reducer) export default storereducer.jsimport * as actionTypes from "./constants" const initialState = { counter: 100, } function reducer(state = initialState, action) { switch (action.type) { case actionTypes.ADD_NUMBER: return { ...state, counter: state.counter + action.num } case actionTypes.SUB_NUMBER: return { ...state, counter: state.counter - action.num } default: return state } } export default reduceractionCreators.jsimport * as actionTypes from "./constants" export const addNumberAction = (num) => ({ type: actionTypes.ADD_NUMBER, num }) export const subNumberAction = (num) => ({ type: actionTypes.SUB_NUMBER, num })constants.jsexport const ADD_NUMBER = "add_number" export const SUB_NUMBER = "sub_number"组件中在
componentDidMount生命周期中定义数据的变化,当数据发生变化时重新设置countercomponentDidMount() { store.subscribe(() => { const state = store.getState() this.setState({ counter: state.counter }) }) }组件中在发生点击事件时,调用
store的dispatch来派发对应的actionaddNumber(num) { store.dispatch(addNumberAction(num)) }完整代码(未使用 react-redux)
import React, { PureComponent } from 'react'
import store from "../store"
import { subNumberAction } from '../store/actionCreators'

export class Home extends PureComponent {
  constructor() {
    super()
    this.state = {
      counter: store.getState().counter
    }
  }

  componentDidMount() {
    store.subscribe(() => {
      const state = store.getState()
      this.setState({ counter: state.counter })
    })
  }

  subNumber(num) {
    store.dispatch(subNumberAction(num))
  }

  addNumber(num) {
    store.dispatch(addNumberAction(num))
  }

  render() {
    const { counter } = this.state

    return (
      <div>
        <h2>Home Counter: {counter}</h2>
        <div>
          <button onClick={e => this.subNumber(1)}>-1</button>
          <button onClick={e => this.addNumber(1)}>+1</button>
        </div>
      </div>
    )
  }
}
使用 react-redux
使用react-redux分成了两大核心:
Providerconnection
Provider
在redux中存在一个store用于存储state,如果将这个store存放在顶层元素中,其他组件都被包裹在顶层元素之上
那么所有的组件都能够受到redux的控制,都能够获取到redux中的数据
使用方式如下:
< Provider  store = {store}>
  <App />
< Provider >
connection
connect方法将store上的getState和 dispatch包装成组件的props。第一个小括号执行connect函数,返回一个高阶组件,再执行一次,传入的参数是组件,就可以对组件进行拦截操作。
导入conect如下:
import { connect } from "react-redux";
用法如下:
connect(mapStateToProps, mapDispatchToProps)(MyComponent)
可以传递两个函数作为参数:
mapStateToProps(state)mapDispatchToProps(dispatch)
mapStateToProps
把redux中的数据映射到react中的props中去
const mapStateToProps = (state) => ({ // 默认传递参数是state
  counter: state.counter
})
组件内部就能够通过props获取到store中的数据
class Foo extends Component {
  constructor(props){
    super(props);
  }

  render(){
    return(
      // 从props中获取mapStateToProps映射的store
      <div>this.props.counter</div>
    )
  }
}

export defaultFoo = connect(mapStateToProps)(Foo)
mapDispatchToProps
将redux中的dispatch映射到组件内部的props中
const mapDispatchToProps = (dispatch) => ({ // 默认传递参数是dispatch
  // addNumber: (num) => dispatch(addNumberAction(num)),
  addNumber(num) {
    dispatch(addNumberAction(num)) // addNumberAction在actionCreators.js中定义
  },
})
class Foo extends Component {
  constructor(props){
    super(props);
  }

  render(){
    return(
      <button onClick = {this.props.addNumber(1)}>点击+1</button>
    )
  }
}

export default Foo = connect(mapStateToProps, mapDispatchToProps)(Foo);
流程图

Redux 中间件
使用场景:异步操作、错误处理、日志监控等
Redux中,中间件就是放在就是在dispatch过程,在分发action进行拦截处理,如下图:

其本质上一个函数,对store.dispatch方法进行了改造,在发出 Action和执行 Reducer这两步之间,添加了其他功能
有很多优秀的redux中间件,如:
redux-thunk:用于异步操作redux-logger:用于日志记录
上述的中间件都需要通过applyMiddlewares进行注册,作用是将所有的中间件组成一个数组,依次执行
然后作为第二个参数传入到createStore中
import { createStore,  applyMiddleware  } from "redux"
import thunk from "redux-thunk"

const store = createStore(reducer, applyMiddleware(thunk, logger));
redux-thunk
npm install redux-thunk用于异步操作

默认情况下的**dispatch(action)**,**action**需要是一个**JavaScript**的对象,想要派发函数 **store.dispatch(function)**就要使用**redux-thunk**中间件增强**dispatch**。
redux-thunk中间件会判断你当前传进来的数据类型,如果是一个函数,将会给函数传入参数值(dispatch,getState)
dispatch函数用于我们之后再次派发actiongetState函数考虑到我们之后的一些操作需要依赖原来的状态,用于让我们可以获取之前的一些状态
所以dispatch可以写成下述函数的形式:
export const changeBannersAction = (banners) => ({
  type: actionTypes.CHANGE_BANNERS,
  banners
})

export const changeRecommendsAction = (recommends) => ({
  type: actionTypes.CHANGE_RECOMMENDS,
  recommends
})

const getHomeMultidataAction = () => {
  // 派发后自动执行
  return function(dispatch, getState) {
    axios.get("http://xxx.xx.xx.xx/test").then(res => {
      const banners = res.data.data.banner.list
      const recommends = res.data.data.recommend.list

      // dispatch({ type: actionTypes.CHANGE_BANNERS, banners })
      // dispatch({ type: actionTypes.CHANGE_RECOMMENDS, recommends })
      dispatch(changeBannersAction(banners))
      dispatch(changeRecommendsAction(recommends))
    })
  }
}
组件调用异步请求数据
export class Test extends PureComponent {
  componentDidMount() {
    this.props.fetchHomeMultidata()
  }

  render() {
    return (
      <div>
        <h2>Test Page: {this.props.banners}</h2>
      </div>
    )
  }
}

const mapStateToProps = (state) => ({
  banners: state.data.banners
})

const mapDispatchToProps = (dispatch) => ({
  fetchHomeMultidata() {
    dispatch(fetchHomeMultidataAction())
  }
})

export default connect(mapStateToProps, mapDispatchToProps)(Test)
实现原理
function thunk(store) {
  const next = store.dispatch
  function dispatchThunk(action) {
    if (typeof action === "function") {
      // 若传入的是函数, 则立即执行该函数action
      action(store.dispatch, store.getState)
    } else {
      next(action)
    }
  }
  store.dispatch = dispatchThunk
}

export default thunk
redux-logger
日志记录中间件的实现原理
function log(store) {
  // 记录之前的dispatch
  const next = store.dispatch

  function logAndDispatch(action) {
    console.log("当前派发的action:", action)
    // 真正派发的代码: 使用之前的dispatch进行派发
    next(action)
    console.log("派发之后的结果:", store.getState())
  }

  // monkey patch: 猴补丁 => 篡改现有的代码, 对整体的执行逻辑进行修改
  store.dispatch = logAndDispatch
}

export default log
日志记录中间件的使用
import { applyMiddleware, createStore } from 'redux';
import createLogger from 'redux-logger';

const logger = createLogger();
const store = createStore(reducer, applyMiddleware(logger));
connect 函数的实现原理
// connect的参数:
// 参数一: 函数
// 参数二: 函数
// 返回值: 函数 => 高阶组件
import { PureComponent } from "react";
import store from "../store"

export function connect(mapStateToProps, mapDispatchToProps) {
  // 高阶组件: 函数
  return function(WrapperComponent) {
    class NewComponent extends PureComponent {
      constructor(props) {
        super(props)

        // 第三步:获取到store中的数据用于更新用到的数据
        this.state = mapStateToProps(store.getState())
      }

      // 第二步:监听数据的改变
      componentDidMount() {
        this.unsubscribe = store.subscribe(() => {
          // 强制更新
          // this.forceUpdate()
          // 使用到的数据才更新
          this.setState(mapStateToProps(store.getState()))
        })
      }

      componentWillUnmount() {
        this.unsubscribe()
      }

      render() {
        // 第一步
        const stateObj = mapStateToProps(store.getState())
        const dispatchObj = mapDispatchToProps(store.dispatch)
        return <WrapperComponent {...this.props} {...stateObj} {...dispatchObj}/>
      }
    }

    return NewComponent
  }
}
优化:解藕store
connect.js
// connect的参数:
// 参数一: 函数
// 参数二: 函数
// 返回值: 函数 => 高阶组件
import { PureComponent } from "react";
import { StoreContext } from "./StoreContext";
// import store from "../store"

export function connect(mapStateToProps, mapDispatchToProps, store) {
  // 高阶组件: 函数
  return function(WrapperComponent) {
    class NewComponent extends PureComponent {
      constructor(props, context) {
        super(props)

        // 第三步:获取到store中的数据用于更新用到的数据
        // this.state = mapStateToProps(store.getState())
        this.state = mapStateToProps(context.getState())
      }

      // 第二步:监听数据的改变
      componentDidMount() {
        this.unsubscribe = this.context.subscribe(() => {
          // 强制更新
          // this.forceUpdate()
          // 使用到的数据才更新
          // this.setState(mapStateToProps(store.getState()))
          this.setState(mapStateToProps(this.context.getState()))
        })
      }

      componentWillUnmount() {
        this.unsubscribe()
      }

      render() {
        // 第一步
        const stateObj = mapStateToProps(this.context.getState())
        const dispatchObj = mapDispatchToProps(this.context.dispatch)
        return <WrapperComponent {...this.props} {...stateObj} {...dispatchObj}/>
      }
    }

    NewComponent.contextType = StoreContext

    return NewComponent
  }
}
storeContext.js
import { createContext } from "react";

export const StoreContext = createContext()
index.js
export { StoreContext } from "./StoreContext"
export { connect } from "./connect"
使用时提供storeContext获取store
import { StoreContext } from "./hoc"
import store from './store';

const root = ReactDOM.createRoot(document.getElementById('root'));
root.render(
    < StoreContext .Provider value={store}>
      <App />
    </ StoreContext .Provider>
);
计数器案例
index.js中使用configureStore创建redux的store
// store/index.js
import { configureStore } from "@reduxjs/toolkit"
import counterReducer from "./modules/counter"

const store = configureStore({
  reducer: {
    counter: counterReducer
  }
})

export default store
- 使用
createSlice配置计数器的reducer
// counter.js
import { createSlice } from "@reduxjs/toolkit"

const counterSlice = createSlice({
  name: "counter",
  initialState: {
    count: 99,
    message: "Hello World"
  },
  reducers: {
    addNumberAction(state, { payload }) {
      state.count = state.count + payload
    },
    subNumberAction(state, { payload }) {
      state.count = state.count - payload
    },

    changeMessageAction(state, { payload }) {
      console.log(payload)
      state.message = payload
    }
  }
})
export const { addNumberAction, subNumberAction, changeMessageAction } = counterSlice.actions
export default counterSlice.reducer
- 使用
Provider包裹根组件,为组件提供store
// index.js
import { Provider } from "react-redux"

const root = ReactDOM.createRoot(document.getElementById('root'));
root.render(
  <Provider store={store}>
    <App />
  </Provider>
);
- 使用
react-redux库中的connect高阶组件连接redux和react组件
// App.jsx
import React, { memo } from 'react'
import { connect } from "react-redux"
import { addNumberAction, subNumberAction } from './store/modules/counter'

const App = memo((props) => {
  const { count, addNumber, subNumber } = props

  function addNumberHandle(num, isAdd = true) {
    if (isAdd) {
      addNumber(num)
    } else {
      subNumber(num)
    }
  }

  return (
    <div>
      <h2>当前计数: {count}</h2>
      <button onClick={e => addNumberHandle(1)}>+1</button>
      <button onClick={e => addNumberHandle(6)}>+6</button>
      <button onClick={e => addNumberHandle(6, false)}>-6</button>
    </div>
  )
})

const mapStateToProps = (state) => ({
  count: state.counter.count
})

const mapDispatchToProps = (dispatch) => ({
  addNumber(num) {
    dispatch(addNumberAction(num))
  },
  subNumber(num) {
    dispatch(subNumberAction(num))
  }
})

export default connect(mapStateToProps, mapDispatchToProps)(App)
项目结构
根据业务来划分redux需要的四个文件。
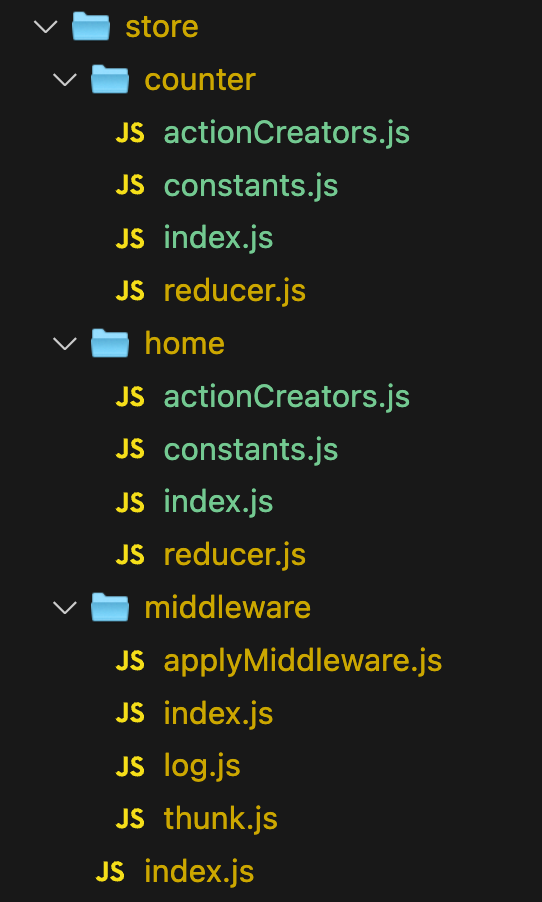
使用combineReducers()在外层index.js中将多个reducer合并在一起
import { createStore, compose, combineReducers } from "redux"
import { thunk, applyMiddleware } from "./middleware"

const reducer = combineReducers({
  counter: counterReducer,
  home: homeReducer,
})
const store = createStore(reducer, applyMiddleware(thunk))
兼容开发工具redux-devtools
const composeEnhancers = window.__REDUX_DEVTOOLS_EXTENSION_COMPOSE__({trace: true}) || compose;
const store = createStore(reducer, composeEnhancers(applyMiddleware(thunk)))
combineReducers实现原理
function reducer(state = {}, action) {
  // 返回一个对象, store的state
  return {
    // 执行counterReducer并传入2个参数
    counter: counterReducer(state.counter, action),
    // 相当于
    // counter: { counter: 100 }
    home: homeReducer(state.home, action),
  }
}