
Vue-Cli
2023年5月8日
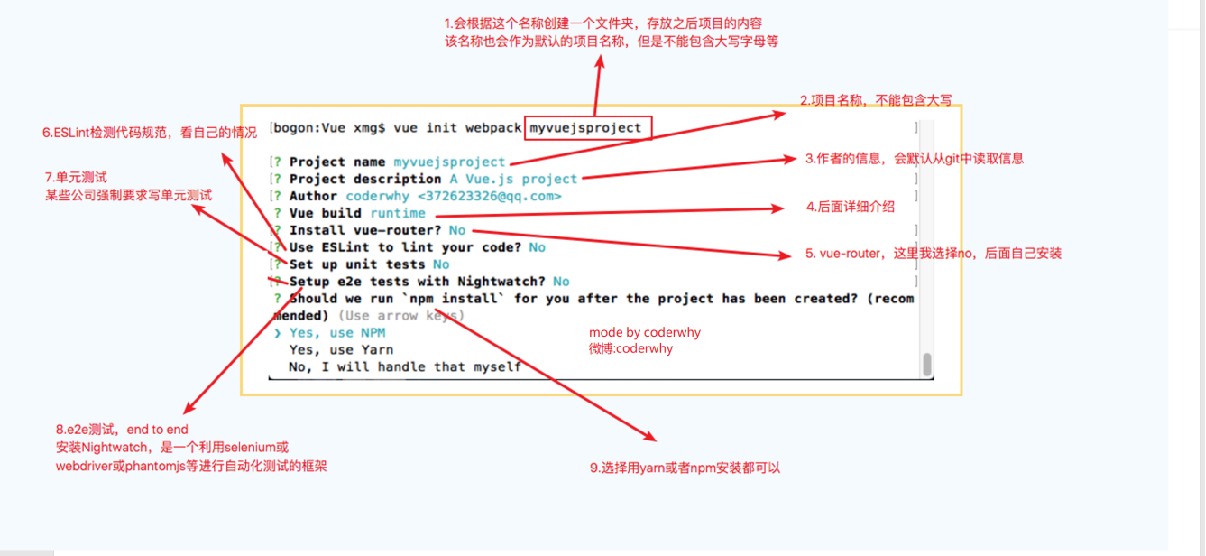
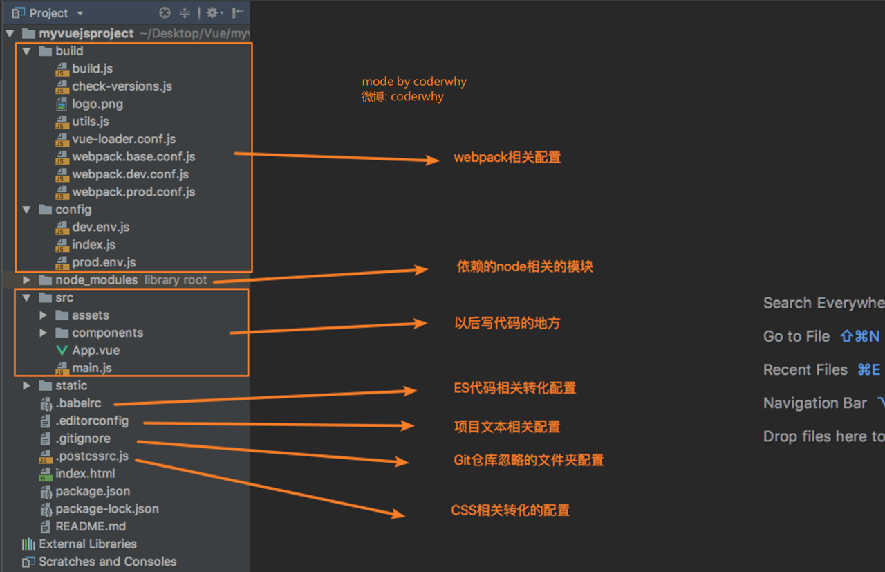
Vue CLI2
- 初始化项目:
vue init webpack my-project(基于 webpack)
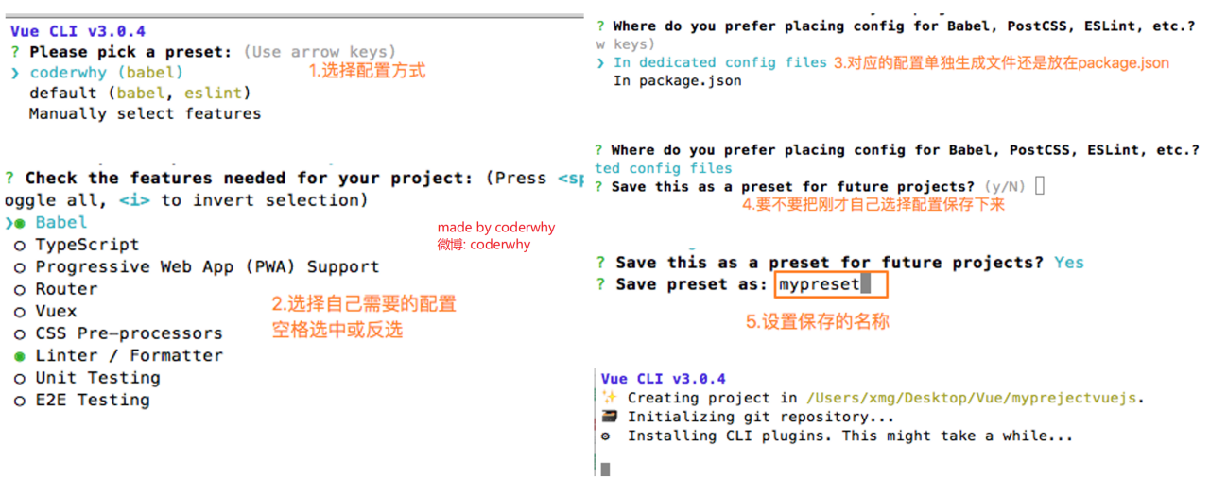
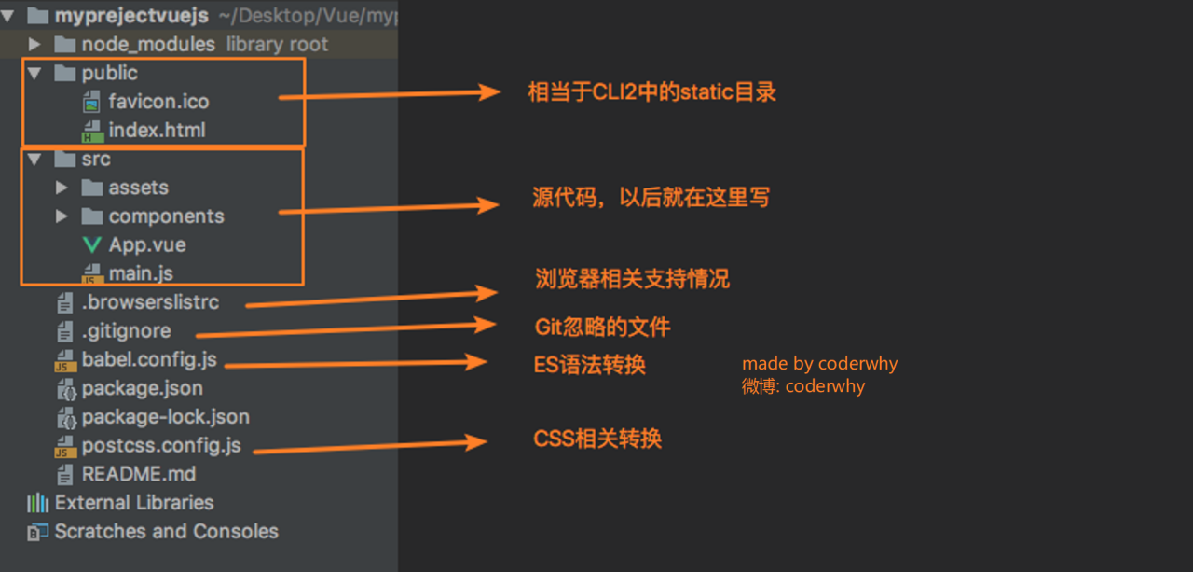
Vue CLI3
- 初始化项目:
vue create my-project(基于 webpack)npm init vue@latest(基于 vite)
Runtime-Compiler 和 Runtime-only
如果在开发中使用 template,选择 Runtime-Compiler。
import { createApp } from 'vue/dist/vue.esm-bundler'如果在开发中使用的是.vue 文件夹开发,那么可以选择 Runtime-only
import { createApp } from 'vue'
// 一下两者等价
// 这种情况需要编译器
new Vue({
  el: '#app',
  components: { App },
  template: '<App>'
})

// 这种情况不需要
new Vue({
  el: '#app',
  render: h => h(App)
})
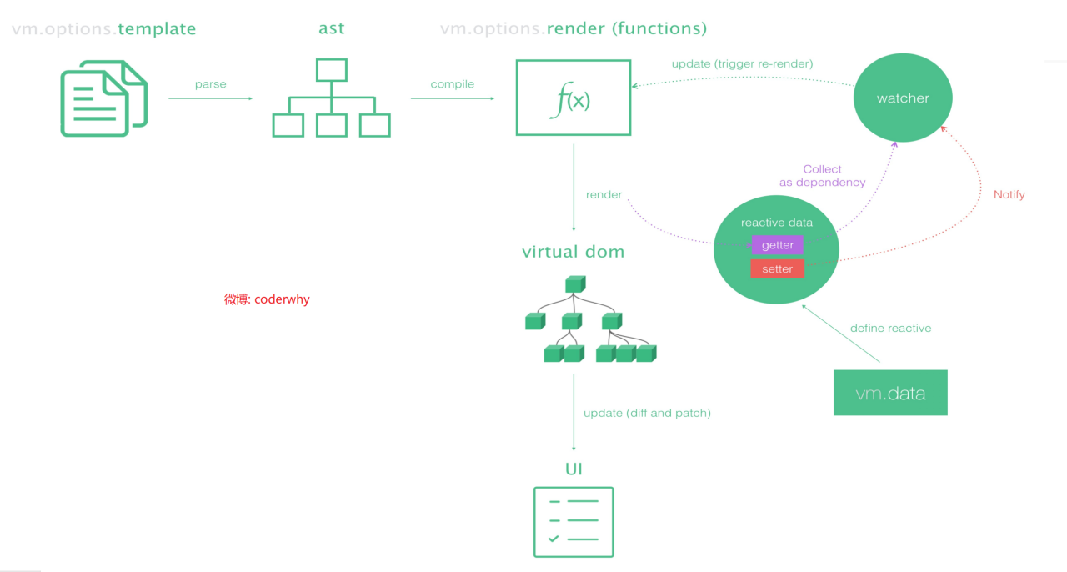
Vue 程序运行过程
template→ast(Runtime-Compiler)→render→vdom→真实dom
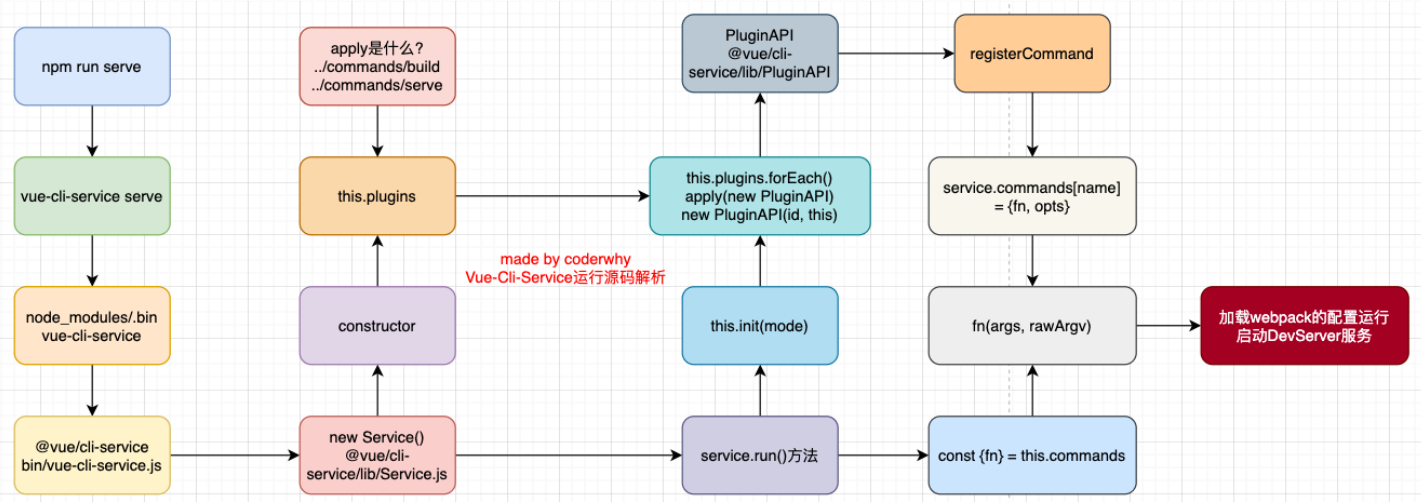
Vue Cli 的运行原理
脚手架开发
准备环境
创建 package.json 文件
使用命令npm init生成
创建入口文件 index.js
在package.json中引入以下代码
  "bin": {
    "my-cli": "./lib/index.js"
  },
在index.js中添加node自动运行command脚本命令
#!/usr/bin/env node
通过建立npm 软链接来测试脚手架搭建(若不建立软链接,需要npm public发布之后才能使用)
npm link
option 选项及封装
安装commander.js:npm install commander
#!/usr/bin/env node
const { program } = require('commander');

// 1.处理--version的操作
const version = require('../package.json').version;
program.version(version, "-v, --version", "版本信息");

// 2.增强其他options的操作
program.option("-xmy", "作者信息");
program.option("-d, --dest <dest>", "a destination folder, eg. -d src/components");

// 监听help事件(必须加载解析之前)
program.on('--help', () => {
    console.log("");
    console.log("others");
    console.log("  xxx");
    console.log("  yyy");
})

// 让commander解析process.argv参数
program.parse(process.argv);

// 获取额外传递的参数
console.log(program.opts().dest);
创建lib/core/help-options.js封装 option 选项
const { program } = require('commander');

function helpOptions() {
    // 1.处理--version的操作
    const version = require('../../package.json').version;
    program.version(version, "-v, --version", "版本信息");

    // 2.增强其他options的操作
    program.option("-xmy", "作者信息");
    program.option("-d, --dest <dest>", "a destination folder, eg. -d src/components");

    // 监听help事件(必须加载解析之前)
    program.on('--help', () => {
        console.log("");
        console.log("others");
        console.log("  xxx");
        console.log("  yyy");
    })
}

module.exports = helpOptions;
index.js中调用helpOptions()函数
const helpOptions = require('./core/help-options');

// 1.配置所有的options
helpOptions();

// 让commander解析process.argv参数
program.parse(process.argv);
脚手架创建模版项目
action 选项 clone 模板
安装依赖npm install download-git-repo,实现使用命令my-cli create app 创建一个vue的模板。
#!/usr/bin/env node
const { program } = require('commander');
const helpOptions = require('./core/help-options');
const { createProjectAction } = require('./core/actions');

// 1.配置所有的options
helpOptions();

// 2.增加具体的一些功能操作
program
    .command('create <project-name> [...others]') // 定义命令的名称
    .description('clone a repository into a folder, eg: nodom create app') // 描述
    .action(createProjectAction)

// 让commander解析process.argv参数
program.parse(process.argv);
在core/action.js下封装createProjectAction函数
// node自动promise化工具
const { promisify } = require('util');
const download = promisify(require('download-git-repo'));
const { NODOM_REPO } = require('../config/repo');

async function createProjectAction(project) {
    // 1.从编写的项目模板中如github/gitee中clone项目
    try {
        await download(NODOM_REPO, project, { clone: true })
    } catch (error) {
        console.log("clone template failed!");
    }
}

module.exports = {
    createProjectAction
}
封装下载地址repo常量在config/repo.js
// direct探测github地址,需要加上#main主分支
const NODOM_REPO = "direct:https://github.com/coderwhy/vue3_template.git#main"

module.exports = {
    NODOM_REPO
}
脚手架安装和运行 npm 命令
封装 exec-command.js 工具类
使用spawn开启子线程执行命令npm install 和npm run dev
// util/exec-command.js
const { spawn } = require('child_process')

function execCommand(...args) {
    return new Promise((resolve, reject) => {
        // npm install/npm run dev
        // 开启子进程执行命令
        const childProcess = spawn(...args)
        // 将子进程的输入及错误信息放入process
        childProcess.stdout.pipe(process.stdout)
        childProcess.stderr.pipe(process.stderr)
        // 监听子进程的关闭事件
        childProcess.on('close', () => {
            resolve()
        })
    })
}

module.exports = execCommand
在 actions.js 中调用工具函数
// node自动promise化工具
const { promisify } = require('util');
const download = promisify(require('download-git-repo'));
const { NODOM_REPO } = require('../config/repo');
const execCommand = require('../util/exec-command');
const chalk = require('chalk')


async function createProjectAction(project) {
    try {
        // 1.从编写的项目模板中如github/gitee中clone项目
        await download(NODOM_REPO, project, { clone: true })

        // 2.提示执行npm install
        console.log(`${chalk.green(`cd ${project}`)}`);
        console.log(`${chalk.green("npm install")}`);
        console.log(`${chalk.green("npm run dev")}`);

        console.log(process.platform);
        const commandName = process.platform === "win32" ? "npm.cmd" : "npm";
        // 3.帮助执行npm install
        await execCommand(commandName, ["install"], { cwd: `./${project}` })

        // 4.帮助执行npm run dev
        await execCommand(commandName, ["run", "dev"], { cwd: `./${project}` })

    } catch (error) {
        console.log("clone template failed!");
    }
}

module.exports = {
    createProjectAction
}
脚手架创建和添加组件
安装模版解析库:npm install ejs -D
编写模版 ejs
<template>
  <div class="<%= lowerName %>">
    <h2><%= name %>: {{ message }}</h2>
  </div>
</template>

<script setup>
import { ref } from 'vue'

const message = ref("hello nodom")
</script>

<style lang="less" scoped>

</style>
封装编译模版工具类
// 编译模版工具函数util/compile-ejs.js
const ejs = require('ejs')
const path = require('path')

function compileEjs(tempName, data) {
    return new Promise((resolve, reject) => {
        // 1.获取当前模版路径
        const tempPath = `../template/${tempName}`
        const absolutePath = path.resolve(__dirname, tempPath)

        // 2.使用ejs引擎编译模版
        ejs.renderFile(absolutePath, data, (err, result) => {
            if(err) {
                console.log("编译模版失败:", err)
                reject(err)
                return
            }

            resolve(result)
        })
    })
}

module.exports = compileEjs
封装写入文件工具类
// 将组件添加写入文件write-file.js
const fs = require('fs')

function writeFile(path, content) {
    return fs.promises.writeFile(path, content)
}

module.exports = writeFile
actions 中调用工具类
const compileEjs = require('../util/compile-ejs');
const writeFile = require('../util/write-file');
const { program } = require('commander')
// ...

async function addComponentAction(cpnname) {
    // 1.创建一个组件组件:编写组件的模版,根据内容给模版中填充数据
    const result = await compileEjs("component.vue.ejs", { name: cpnname, lowerName: cpnname.toLowerCase() })

    // 2.将result写到对应的文件夹
    const dest = program.opts().dest || "src/components"
    await writeFile(`${dest}/${cpnname}.vue`, result)
    console.log("创建组件成功", cpnname);
}

module.exports = {
    // ...
    addComponentAction
}
第三方工具库
- 美化工具:
npm install chalk@4.0.0 - 命令行交换工具:
npm install inquirer - banner logo 生成工具:
npm install figlet - 图标符号生成工具:
npm install log-symbols
Loading...