
Vue-Router
2023年5月8日
路由2种模式
- URL的hash路径:带#号,本质上是改变window.location的href属性。
- HTML5的history模式:不带#号,
history.pushState()(可返回)、history.replaceState()(不可返回)、history.go(-1)、history.back()、history.forward()
安装
npm install vue-router --save
vue-router框架
Vue.user(VueRouter):底层执行插件的install方法- 创建VueRouter对象
- 挂载到Vue实例上
import VueRouter from 'vue-router'
import Vue from 'vue'

// 1.通过Vue.use(插件), 安装插件
Vue.use(VueRouter)

// 2.创建VueRouter对象
const routes = [
  {
    path: xxx
    component: xxx
  },
  {
    path: xxx
    component: xxx
  }
]

const router = new VueRouter({
  //routes: [
  //  ...
  //]
  // 配置路由和组件之间的应用关系
  routes
  // 配置history模式,默认是hash模式
  mode: 'history'
})

// 3.将router对象传入到Vue实例
export default router

// 4.Vue实例中挂载router
// 实质:Vue.prototype.$router = router
new Vue({
  el: #app
  router
})
配置vue-router映射关系步骤
第一步:创建路由组件
import Home from '../components/Home'
import About from '../components/About'
第二步:在VueRouter对象中配置路由映射:组件和路径映射关系
const routes = [
  {
    // 重定向默认路径
    path: '',
    redirect: /home
  },
  {
    path: /home,
    component: Home
  },
  {
    path: /about,
    component: About
  }
]
第三步:在App.vue主页使用路由
<router-link>和<router-view><router-link>:vue-router中内置的组件,会被渲染成<a>标签<template> <div> <router-link to="/home">主页</router-link> <router-link to="/about">关于</router-link> // 页面渲染占位 <router-view></router-view> </div> </template>
细节处理
默认路由
const routes = [
  {
    // 重定向默认路径
    path: '',
    redirect: /home
  },
  ...
}
路由模式
const router = new VueRouter({
  routes
  // 配置history模式,默认是hash模式
  mode: 'history'
})
router-link属性
to:用于指定跳转的路径。tag:指定<router-link>之后渲染成什么组件,如button。replace:后退键返回不能返回到上一个页面中。active-class:当<router-link>对应的路由匹配成功时, 会自动给当前元素设置一个router-link-active的class。const router = new VueRouter({ ... linkActiveClass: 'active' })
动态路由
/user/:id:传递参数this.$route.params.id:js代码获得参数{{ $route.params.id }}:Mustache 获得参数
参数传递
params类型:如
/router/123query 类型,如
/router?id=123// <router-link>传递参数 <router-link :to="{ path: '/router/' + 123, query: { name: 'Nevermore', age: 22 }}" /> // JS代码传递参数 method() { this.$router.push({ path: '/router/' + 123, query: { name: 'Nevermore', age: 22 }}" }) }
Route和Router区别
$route是处于活跃状态的路由对象,可以获取name、path、query、params等(获取url传过来的参数this.$route.params.userId)
$router是 VueRouter的实例对象,想要导航到不同URL,则使用$router.push方法(可以通过代码跳转路由)
ButtonClick() {
  this.$router.push('/home')
  this.$router.replace('/home')
}
路由懒加载
组件被使用的时候,才加载
原来:import Home from '../components/Home'
懒加载:const Home = () ⇒ import(../components/Home)
嵌套路由
children:[ ... ]
// index.js
{
  path: '/home',
  component: Home,
  children: [
    {
      path: '',
      redirect: 'news'
    },
    {
      path: 'news',
      component: HomeNews
    },
    {
      path: 'message',
      component: HomeMessage
    }
  ]
}
// Home.vue
<template>
  <div>
    <route-link to="/home/news" tag="button">新闻</route-link>
    <route-link to="/home/message">消息</route-link>
    <router-view></router-view>
  </div>
</template>
全局导航守卫
router.beforeEach
to:Route:即将要进入的目标的路由对象。from:Route:当前导航即将要离开的路由对象。next:Function:调用该方法后, 才能进入下一个钩子。next():进行下一个钩子函数。next(false):中断当前导航。next('/'):若未登录,跳转到登录页面。next(error):传入error,导航被终止并将该错误传递给router.onError()
// index.js
{
  path: '/home',
  component: Home,
  // 描述数据的数据
  meta: {
    title: '首页'
  }
}

// 前置守卫
router.beforeEach((to, from, next) => {
  // 从from跳转到to
  document.title = to.matched[0].meta.title
  // next必须调用
  next()
})

// 后置钩子(钩子=回调)
router.afterEach((to, from) => {
  console.log('-----')
})
路由独享守卫
- 路由配置上定义
beforeEnter守卫。
组件内守卫
- 在路由组件内定义
beforeRouteEnter、beforeRouteUpdate、beforeRouteLeave守卫。
Keep-alive
概念:是Vue内置的一个组件,可以使被包含的组件保留状态(缓存起来),或避免重新污染。
- include:只有匹配的组件会被缓存。
- exclude:任何匹配的组件都不会被缓存。
// 排除的属性为组件中定义的name, 所有的路径匹配到的视图组件都会被缓存
<keep-alive exclude="Profile,User">
  <router-view></router-view>
</keep-alive>
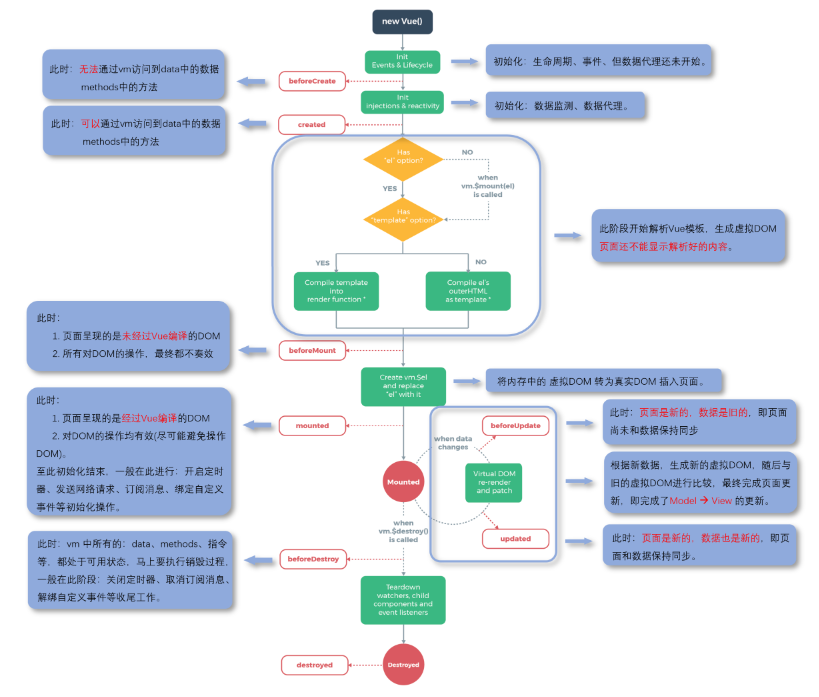
生命周期钩子
Loading...